As the software company grows, so does the complexity of their product. With many different teams working on the same product, it’s often hard to ensure that defects in the software are not shipped to the end customer.
One way to ensure software quality is with a well known continuous integration server called Jenkins and its DepBuilder plugin - Jenkins plugin for setting up build pipelines and managing project dependencies.
In this guide we will show you how to set up a build pipeline that consists of existing interconnected Jenkins jobs that has to be built in a specific order.
Scenario
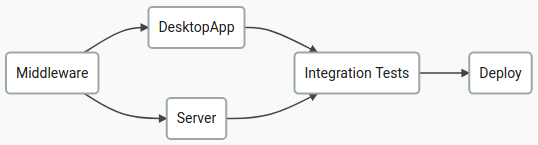
Say, we would like to build a large application that consists of a middleware library, a desktop application and the server. Both desktop application and the server code depend on the middleware library, which means that the library has to be built before any of the mentioned projects.
Our desired continuous delivery pipeline looks like the following:
With DepBuilder plugin, we can set up the desired build in the 3 easy steps:
- Create a new DepBuilder project
- Define the build pipeline with the DepBuilder domain specific langauge
- Watch the build progress
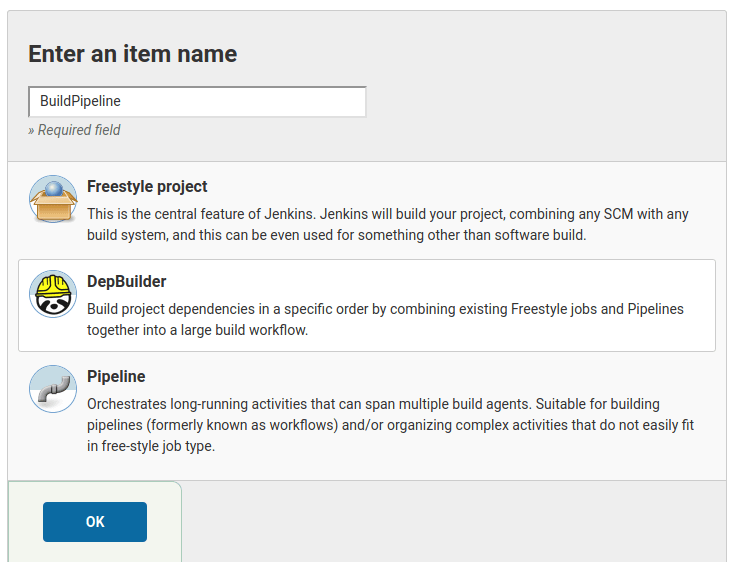
1. Create a new DepBuilder project
On the Jenkins dashboard, click on the New Item in the left sidebar, select the
DepBuilder project and pick the relevant project name:
2. Define the build pipeline
The build pipeline is defined with the DepBuilder’s domain specific language (DSL). The DSL follows the Fail Fast philosophy and will warn you about typos, missing build agents, cyclic dependencies and other problems every time you save the script. The graph below the script input box is automatically updated and shows the connections between the jobs in the Jenkins build pipeline.
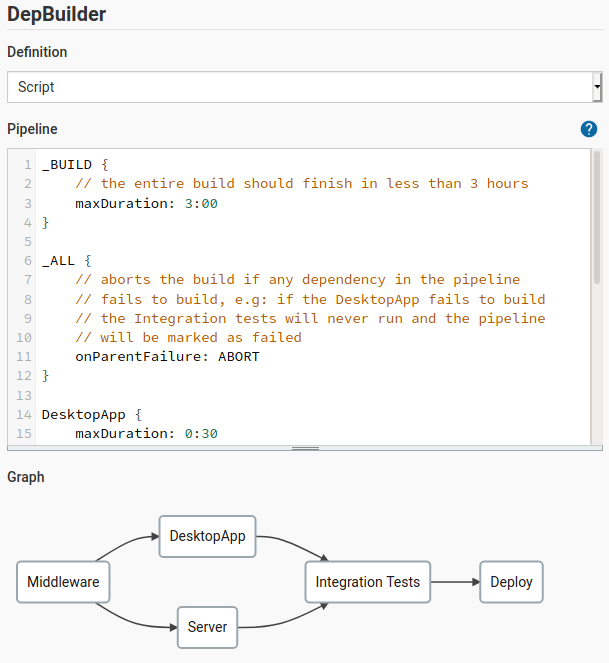
The DepBuilder build pipeline script for our example is shown below:
_BUILD {
    // the pipeline build should finish in less than
    // 4 hours and 30 minutes otheriwse it will be aborted
    maxDuration: 4:30
}

DesktopApp {
    // The build will run on one of the specified runners.
    agent: [windows_agent_1, windows_agent_2]
    maxDuration: 0:15
}

Server {
    // The Server job will try to build even if the
    // Middleware library project build fails
    onParentFailure: BUILD
}

// names of the existing jenkins jobs that should be built
// as part of the pipeline (Freestyle, Pipeline, etc...)
Middleware -> DesktopApp -> "Integration Tests"
Middleware -> Server -> "Integration Tests"
"Integration Tests" -> Deploy
For more info about the DepBuilder features and DSL syntax make sure to check the DepBuilder documentation pages.
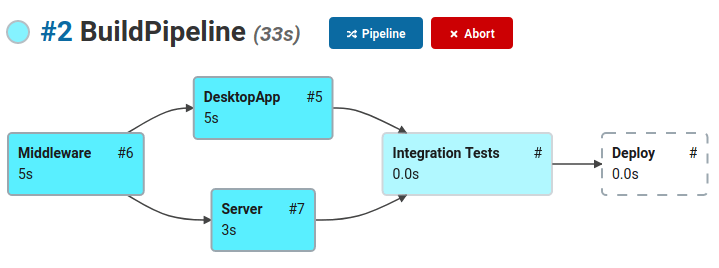
3. Watch the build progress
After clicking on the Run Build button, you can observe the pipeline build progress
on the DepBuilder’s project dashboard.
Is your Jenkins build pipeline slow?
Upgrade to DepBuilder Pro to parallelize dependency builds with no changes to your existing pipeline script.
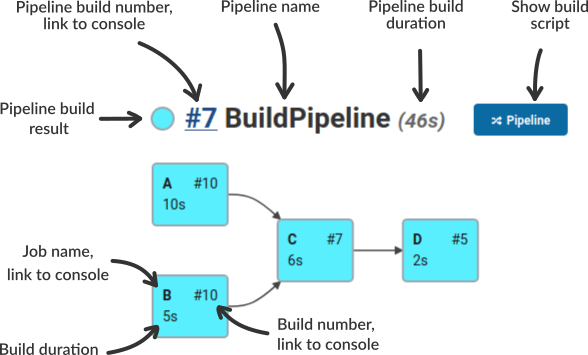
The build visualization graph is packed with information:
Additional material
To learn more about the DepBuilder features, make sure to check out: